- Docs
- /
Azure SQL Database Backup and Restore
25 Feb 2021 68700 views 0 minutes to read Contributors ![]()
![]()
Backup for Azure SQL Database
Database backups are an essential part of any business continuity and disaster recovery strategy, because they protect your data from corruption or deletion. These backups enable database restore to a point in time within the configured retention period.
In both SQL Database and SQL Managed Instance use SQL Server technology to create full backups every week, differential backups every 12-24 hours, and transaction log backups every 5 to 10 minutes. The frequency of transaction log backups is based on the compute size and the amount of database activity.
The first full backup is scheduled immediately after a new database is created or restored. This backup usually completes within 30 minutes, but it can take longer when the database is large. For example, the initial backup can take longer on a restored database or a database copy, which would typically be larger than a new database. After the first full backup, all further backups are scheduled and managed automatically. The exact timing of all database backups is determined by the SQL Database or SQL Managed Instance service as it balances the overall system workload. We cannot change the schedule of backup jobs or disable them.
The backup retention period depends on the SQL Azure database service-tier. Basic service-tier offers a 7 day retention policy and Standard and Premium service-tiers offer 35 day retention policies. Be aware that when you downgrade from a Standard or Premium service-tier to the Basic service-tier, you will lose backups older than 7 days. We can retain longer retention for SQL Azure backups by configuring a long-term retention.
The long-term retention feature allows you to store SQL Azure full database backups up to 10 years. It uses the Azure Recovery Services vault that allows up to 1000 databases per vault.
The long-term backup retention can be configured in the SQL Azure server, but as a prerequisite it needs a Recovery Service Vault to store the backups.

Configure Backup Retention Settings

Activity Log

Restores for Azure SQL Database
Restore Deleted Database
Below screenshot currently available databases in our Azure SQL Instance, we will delete database SampleDB_Restore1 and recover it.

To restore a deleted database, in the Azure Portal go to the SQL Azure server where the deleted database was stored and then click on the Deleted databases option:

In the above screen you can see that I have a deleted database in this SQL Azure server. All the deleted databases will be listed in the right pane.
If a database was deleted earlier than the last backup retention period you will not be able to restore it anymore. This mean, 7 days for a Basic Edition and 30 days for other editions.
To recover a deleted database, just click on the respective row in the right pane. This will present a similar screen as the following:

Once we click on Review and create it will initiate it will show and confirm all details regarding restore.

After confirming all details, we can start restore operation by clicking on Create and it will update like below once deployment is complete.

Point in time restore
In SQL Azure, when restoring from automated backups, it is always a point in time restore, meaning that you do not choose the backup file or files to be restored, but provide the exact restore point in time.
When restoring from an existing database, you must provide a restore point in time.
The Restore option is the second item in the context menu. Click on it to start the restore process.
Note that SQL Azure does not let you restore over an existing database, so you have two options here:
- Restore the database providing a new database name
- Rename the current database name so you can restore to a new database using the old database name.

After selecting restore we can enter database name with which you want to restore.

Once the restore is completed it will display message as below.

Below is the screenshot of Object explorer once restore operation is deployed.

Migrating Database through BACPAC
A BACPAC file is a ZIP file with an extension of BACPAC containing the metadata and data from the database. A BACPAC file can be stored in Azure Blob storage or in local storage in an on-premises location and later imported back into Azure SQL Database, Azure SQL Managed Instance, or a SQL Server instance.
Creating BACPAC file for migrating :

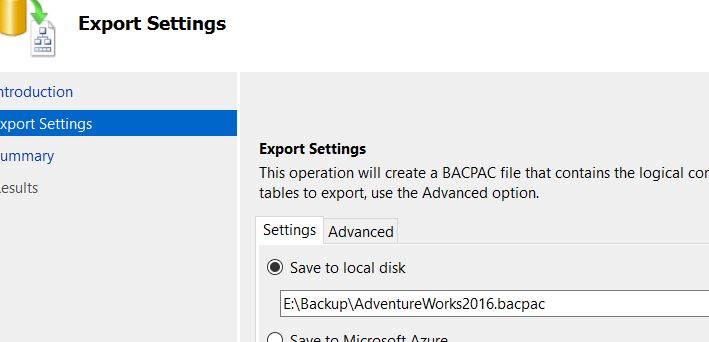
We can create BACPAC file on local disk or on a Blob container in Azure Storage


Deploying BACPAC file :

We can use BACPAC file stored on local or from Azure storage,


Using Azure Blob Container Storage :
We can also take backup to Blob container in Azure storage.
Either we can take native backup and copy it to Blob container using azcopy application by executing below command
./azcopy.exe copy "D:\DishDemo\AD2k16_CopyOnly.bak" https://dishdemo1.blob.core.windows.net/dishdemobackuptest/AD2k16_CopyOnly.bak?sv=2019-12-12&se=2021-02-22T08%3A03%3A15Z&sr=c&sp=rwl&sig=EsE4cQa3V8q13iUrgg85qMSINH%2FThFpoTGzVQ0vBFOQ%3D
Or by taking backup directly on the Blob container.
For the later, we have to follow below steps.
Prerequisites:
· Get an Azure Account.
· Create an Azure storage account.
· Install SQL Server Management Studio.
· Install SQL Server 2016 or deploy Azure SQL Managed Instance with connectivity established through an Azure SQL virtual machine or point-to-site.
· Assign the user account to the role of db_backupoperator and grant alter any credential permissions.
· Create Azure Blob container, following below steps,
1. Open the Azure portal.
2. Navigate to your Storage Account.
3. Select the storage account, scroll down to Blob Services.
4. Select Blobs and then select + Container to add a new container.
5. Enter the name for the container and make note of the container name you specified. This information is used in the URL (path to backup file) in the T-SQL statements later in this quickstart.
6. Select OK.
· Create credential in SQL using the below TSQL query.
CREATE CREDENTIAL [https://dishdemo1.blob.core.windows.net/dishdemobackuptest]
WITH IDENTITY = 'SHARED ACCESS SIGNATURE',
SECRET = 'sv=2019-12-12&ss=bfqt&srt=sco&sp=rwdlacupx&se=2022-01-26T14:15:27Z&st=2021-01-26T06:15:27Z&spr=https,http&sig=fza8qVgTUN9zkWu4CV7ec0BXq3R0WgRZKedzd7o896U%3D';

· Then we can take backup directly to Blob container path, using below TSQL query.
BACKUP DATABASE [AD2k16]
TO URL = N'https://dishdemo1.blob.core.windows.net/dishdemobackuptest/ad2k16_backup_2021_01_26_115257.bak'
WITH NOFORMAT, NOINIT, NAME = N'AD2k16-Full Database Backup', NOSKIP, NOREWIND, NOUNLOAD,STATS = 10
GO

· We can use backup on Azure Blob storage to restore on any SQL instance using below TSQL query.
USE [master]
RESTORE DATABASE [AD2k16_Restore]
FROM URL = N'https://dishdemo1.blob.core.windows.net/dishdemobackuptest/ad2k16_backup_2021_01_26_115257.bak'
WITH FILE = 1,
MOVE N'AdventureWorks2016_Data' TO N'C:\Program Files\Microsoft SQL Server\MSSQL13.SQL2016\MSSQL\DATA\Adv2k16_Data.mdf',
MOVE N'AW_2' TO N'C:\Program Files\Microsoft SQL Server\MSSQL13.SQL2016\MSSQL\DATA\ADW_2k16.ndf',
MOVE N'AW_Data' TO N'C:\Program Files\Microsoft SQL Server\MSSQL13.SQL2016\MSSQL\DATA\ADW_Data_2k16.mdf',
MOVE N'AdventureWorks2016_Log' TO N'C:\Program Files\Microsoft SQL Server\MSSQL13.SQL2016\MSSQL\DATA\Ad2k16_Log.ldf',
NOUNLOAD, STATS = 5
GO
